
Sunday, April 24, 2011
Friday, April 22, 2011
Making The Oil Tank - Part Two.. '56 Triumph Project
This tank is going to have an integrated oil cooler. The triangular tube/duct that I'm making will cut through the tank from the top left front (intake) to the lower right back (outlet).


Fins on the air duct will reduce the inside temperature, especially the oil returning from the engine will directly land on the cooling duct instead of the warm oil.

The vertical angle/form of the duct has been designed aligning to the gas tank's bottom for efficient/continuous air flow.

Thursday, April 21, 2011


Tuesday, April 19, 2011
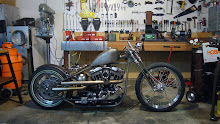
Michael Schmidt Photography
Michael from "Michael Schmidt Photography" visited my workshop and shot some pictures. He is known for his Vintage/Motorcycle photography, he does outstanding work, for more check it out here.


Monday, April 18, 2011

Saturday, April 16, 2011


Saturday, April 9, 2011
Soon they will be here.. '52 LSR Project
Update for the LSR project.
Tappets are already sent out for regrinding.

Thursday, February 3, 2011


Sunday, January 9, 2011
Announcing Bonneville Project 2011.. '52 LSR Project
We will be at the Bonneville Salt Flats this summer for speed week. The bike I will prepare is a 1952 Triumph.
It will be this engine which is actually a '52 6T, I probably will use the swing arm frame for another pre-unit project.
 The matching Pre-Unit rigid frame.

Friday, December 17, 2010

New Work Table
One work bench was not enough so i had to build this one. 8' x 3' with 3/8" thick steel top, perfect for sheet metal work. It also has a sliding welding table underneath.

Tuesday, November 9, 2010


Saturday, October 23, 2010
Jockey shift components in detail
*** OUT OF STOCK ***
Thanks for all your interest, I'll announce the new batch of shifters when available!
--------------------------------
To order this kit e-mail alp@sungurtekin.com ..
All hardware is 18-8 Stainless Steel including the threaded rod shift linkage for higher Tensile Strength.

The entire jockey shift set up is designed to bolt onto any Harley Sportster engine 1988-2003 without any permanent modifications. The position of the handle is adjustable, it can be moved from the front to the very rear.

Precision hand made.

Friday, October 22, 2010
The Jockey Shifter
This shifter design that i fabricated for "The Whip" got positive attention and several orders so i decided to post some images of its build progress.

It makes it easier to design it in 3d first, so i can figure out the proportions and get a printout for the 1/1 scale diagram. This way the hand made components look more precise.

My client who ordered this one will install it on a Flyrite "Smoking Gun" as well.


Below you can see the beveled edge, I used a hand file to achieve this form.

To the left is the lower arm, connected to the main bracket.

The clutch lever housing bracket is probably the most complicated component of the set-up.


Yeah, I know, not so safe... this machine is unbelievable strong.

Before / After

Lower arm bearing housing.

It makes it easier to design it in 3d first, so i can figure out the proportions and get a printout for the 1/1 scale diagram. This way the hand made components look more precise.
My client who ordered this one will install it on a Flyrite "Smoking Gun" as well.
Below you can see the beveled edge, I used a hand file to achieve this form.
To the left is the lower arm, connected to the main bracket.
The clutch lever housing bracket is probably the most complicated component of the set-up.
Yeah, I know, not so safe... this machine is unbelievable strong.
Before / After
Lower arm bearing housing.

Subscribe to:
Posts (Atom)